今回はラズパイを使ってNTPサーバーを設定する手順を書いていきます。
NTP サーバー(Network Time Protocol Server)とは、インターネットなどのネットワーク上で時刻情報を共有し、各機器の時計を正確に同期させるためのサーバーです。
インストール
今回はchronyというネットワーク上で時刻を同期するためのツールを使ってNTPサーバーを設定していきます。
初めにchronyのインストールを行っていきます。
sudo apt -y install chrony
インストールが完了したらバージョンの確認を行います
chronyd --versionchronyd versionなどが返答されたら正常にインストールができています。
次にchronyのステータスを確認します。インストール後自動で起動していると思います。
systemctl status chronyActive: active (running)となっていたら起動しています。確認できたらctrl+Cでターミナルに戻ってください
NTP同期状況確認と編集
次にNTPクライアントとしての動作確認を行っていきます。
chronyc sourcesと入力して動作確認ができたら次に設定ファイルを編集していきます。
sudo nano /etc/chrony/chrony.conf
と入力して設定ファイルを開いてください
# Welcome to the chrony configuration file. See chrony.conf(5) for more
# information about usable directives.

# Include configuration files found in /etc/chrony/conf.d.
confdir /etc/chrony/conf.d

# Use Debian vendor zone.
+ pool ntp.nict.jp iburst
+ pool time.cloudflare.com iburst
+ pool time.aws.com iburst
+ pool time.google.com iburst
- pool 2.debian.pool.ntp.org iburst
+ #pool 2.debian.pool.ntp.org iburst

# Use time sources from DHCP.
sourcedir /run/chrony-dhcp

# Use NTP sources found in /etc/chrony/sources.d.
sourcedir /etc/chrony/sources.d

# This directive specify the location of the file containing ID/key pairs for
# NTP authentication.
keyfile /etc/chrony/chrony.keys

# This directive specify the file into which chronyd will store the rate
# information.
driftfile /var/lib/chrony/chrony.drift

# Save NTS keys and cookies.
ntsdumpdir /var/lib/chrony

# Uncomment the following line to turn logging on.
#log tracking measurements statistics

# Log files location.
logdir /var/log/chrony

# Stop bad estimates upsetting machine clock.
maxupdateskew 100.0

# This directive enables kernel synchronisation (every 11 minutes) of the
# real-time clock. Note that it can’t be used along with the 'rtcfile' directive.
rtcsync

# Step the system clock instead of slewing it if the adjustment is larger than
# one second, but only in the first three clock updates.
makestep 1 3

# Get TAI-UTC offset and leap seconds from the system tz database.
# This directive must be commented out when using time sources serving
# leap-smeared time.
leapsectz right/UTC

+ # Allow NTP client access from local network.
+ allow 192.168.0.0/24
Code language: PHP (php)
このコードの+の部分を追加で入力、-の部分はコメントアウトなどをしてください
下の方のallowのIPはLAN内の他の機器からこのラズパイのNTPサービス(chronyd)へアクセスを許可する設定なのでallow 192.168.1.0/24このような形でLAN内のすべてのデバイスに許可するようにしてください
設定が完了したらctrl+o→Enterで保存を行いctrl+xでターミナルに戻ってください。
設定ファイルの変更が完了したらchronyの再起動を行ってください。
systemctl restart chrony再起動が終わったら
chronyc sourcesを入力して^*があるのを確認してください、それがNTPサーバで同期しているものになります
Firewall(ufw)許可と同期
sudo apt -y install ufwこのコードでufwをインストール
hostname -I
上記のコードでラズパイのIPアドレスを確認し
WindowsなどのPC側で管理者権限のターミナルを開きWindowsのNTP同期先をラズパイに設定します。
w32tm /config /manualpeerlist:"ラズパイのIPアドレス" /syncfromflags:manual /update
Code language: JavaScript (javascript)
同期後Windowsの時間サービスの再起動を行い、同期の確認を行ってください。
net stop w32time

net start w32time

w32tm /query /status
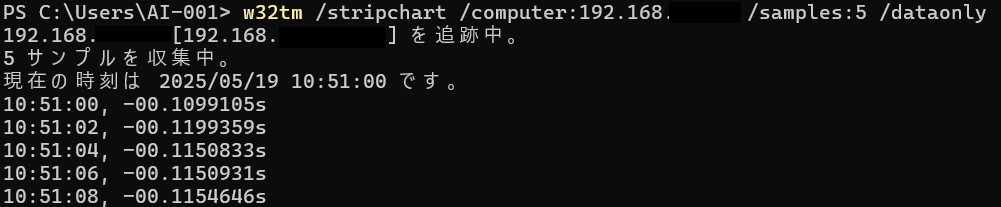
同期の確認までできたらサンプルを取っての確認を行います。
w32tm /stripchart /computer:ラズパイのIPアドレス /samples:5 /dataonly上記のコードで5つの時刻サンプルが帰ってきたら成功です。
またはラズパイ側で
sudo chronyc -a clients
上記のコードを送り、PC側のIPアドレスの表記があれば同期確認ができます
(例)
Hostname                      NTP   Drop Int IntL Last     Cmd   Drop Int  Last
===============================================================================
192.168.1.101                  10     0   64  64     12      0     0   64    5
まとめ
NTPサーバ設定は初めて行いましたが検索するとサンプルもたくさんありかなり簡単に設定することができました。