Contents
注意
この記事だけを見てチュートリアルの操作は多分できない。参考にした資料を基にポイントややってみた感想などを載せていく。
参考:初台DT – スマートライト株式会社 (smartlight.co.jp)
事前知識:https://blog.smartlight.co.jp/?p=2470
チュートリアル1
初台ラボ・デジタルツイン・チュートリアル1 – スマートライト株式会社 (smartlight.co.jp)
~PCの1を押すことでスポットライトの点灯消灯を制御できるようにする~
ヒエラルキーからadd entityでspot lightのエンティティを追加。コード内で名前を使うため覚えておくように。スポットライトの位置は高い位置に調節するとよい。
アセットにはまだ何も入っていないのでフォルダを新しく作り、その中にlightHandler.jsを作成する。これはROOTエンティティにSCRIPTで追加する。
lightHandler.jsには以下の内容を書き込む。
var LightHandler = pc.createScript('lightHandler');

// initialize code called once per entity
LightHandler.prototype.initialize = function() {
    var app = this.app;
    this.spot = app.root.findByName("SpotLight");
};

// update code called every frame
LightHandler.prototype.update = function(dt) {
    var app = this.app;
    if (app.keyboard.wasPressed(pc.KEY_1)){
        this.spot.light.enabled = !this.spot.light.enabled;
    }
};

// swap method called for script hot-reloading
// inherit your script state here
// LightHandler.prototype.swap = function(old) { };

// to learn more about script anatomy, please read:
// https://developer.playcanvas.com/en/user-manual/scripting/
チュートリアル2
初台ラボ・デジタルツイン・チュートリアル2 – スマートライト株式会社 (smartlight.co.jp)
~ボタンを押すとアラート画面が表示される~
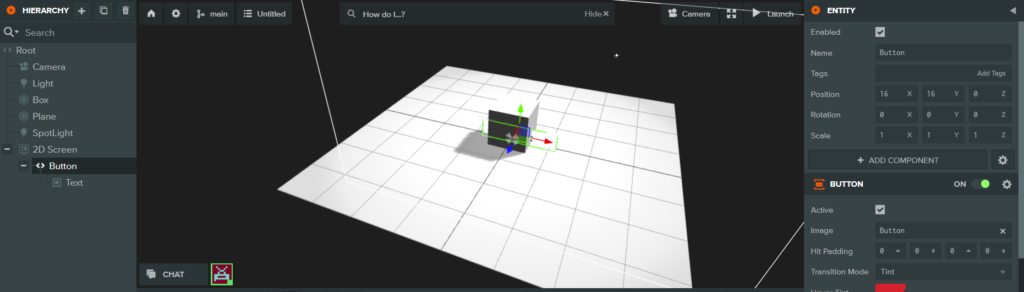
ヒエラルキーから2D Screenを追加。子要素にButtonを追加。
playcanvasにはデフォルトのフォントデータがない!
ここのフォントを使いましょう:https://playcanvas.com/editor/scene/547900
Buttonの要素のTextのエンティティを開き、ELEMENTにフォントをドラッグ&ドロップ。
エンティティでButtonをホバーしたときや押したときの色の編集等ができる。処理は新しくbutton.jsスクリプトを作成し、Buttonに追加する。
var Button = pc.createScript('button');
Button.attributes.add("message", {type:"string", default: "message"})

// initialize code called once per entity
Button.prototype.initialize = function() {
    if(this.app.touch){
        this.entity.element.on(pc.EVENT_TOUCHSTART, () => this.show(this.message))
    }else{
        this.entity.element.on("click", () => this.show(this.message))
    }
};

// update code called every frame
Button.prototype.update = function(dt) {

};
Button.prototype.show = (message) => alert(message)

// swap method called for script hot-reloading
// inherit your script state here
// Button.prototype.swap = function(old) { };

// to learn more about script anatomy, please read:
// https://developer.playcanvas.com/en/user-manual/scripting/
疑問点(原因不明)
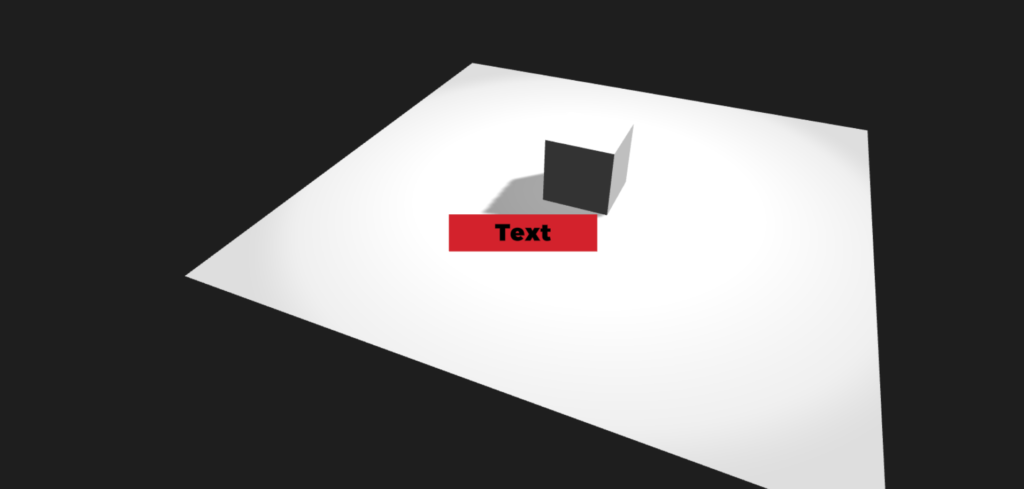
エディタ画面でのボタンの位置と実行画面のボタンの位置が異なる。
現時点でわかること
ボタンは常に画面の中央に存在するが、それ以外(地面、ボックス、ライト等)はエディタ上の表示と同じになる。


チュートリアル3
初台ラボ・デジタルツイン・チュートリアル3 – スマートライト株式会社 (smartlight.co.jp)
~ボタンを押すことでスポットライトの点灯消灯を制御する~
button.jsを編集することでTextボタンを押したときの処理を変えることができる。
var Button = pc.createScript('button');
//Button.attributes.add("message", {type:"string", default: "message"})

// initialize code called once per entity
Button.prototype.initialize = function() {
    var app = this.app;
    this.spot = app.root.findByName("SpotLight");
    // if(this.app.touch){
    //     this.entity.element.on(pc.EVENT_TOUCHSTART, () => this.show(this.message))
    // }else{
    //     this.entity.element.on("click", () => this.show(this.message))
    // }
    if(this.app.touch){
        this.entity.button.on("click", (event) => {
            this.spot.light.enabled = !this.spot.light.enabled;
        });
    }else{
        this.entity.button.on("click", (event) => {
            this.spot.light.enabled = !this.spot.light.enabled;
        });

    }
};

// update code called every frame
Button.prototype.update = function(dt) {

};
//Button.prototype.show = (message) => alert(message)

// swap method called for script hot-reloading
// inherit your script state here
// Button.prototype.swap = function(old) { };

// to learn more about script anatomy, please read:
// https://developer.playcanvas.com/en/user-manual/scripting/
注意
参考にした記事のコードを丸写しするとbuttonが設定されていないというエラーを吐き出す。アロー関数 (() => { ... })が正しく利用できていないので修正した。
チュートリアル4
初台ラボ・デジタルツイン・チュートリアル4 – スマートライト株式会社 (smartlight.co.jp)
~Node-REDからPLAYCANVASにMQTT通信を行う~
今まではRapsberry Pi上でNode-REDを動かしていたが今回はwindowsでnode-REDを使用。
Node-REDをPCに入れていない場合インストールしましょう
Node-REDを扱うにはPCにNode.jsの環境がないといけない。もしNode.jsがない場合は公式サイトからインストールしよう。入っているかわからない時は下のコマンドを実行してみてバージョンが返ってくれば問題ない。
windowsスタート画面の検索に「cmd」と入れればコマンドプロンプトを選べる。
立ち上げたら以下のコマンドを実行。
node --version && npm --version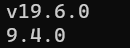
左のようなバージョン情報が返ってくれば環境が整っている。
再び以下のコマンドを実行。これでNode-REDを扱う環境が構築できた。
npm install -g --unsafe-perm node-red次からはコマンドプロンプトから
node-redと打てばNode-REDが起動する。
接続は以下の通り。
サーバに新規に追加でTry – shiftr.ioで出てきたコードを入力する。
ここからmqtt.jsをコピーする。
https://playcanvas.com/project/1079108/overview/light-buttonmqtt
manage.jsのコード
var Manage = pc.createScript('manage');

// initialize code called once per entity
Manage.prototype.initialize = function() {
    let client = mqtt.connect('wss://public:public@public.cloud.shiftr.io:443');
    let topic = "bz";

    client.subscribe(topic);
    this.app.client = client;

    client.on("message", (topic, message) => this.control(message));
};

Manage.prototype.control = function(message){
    var data = message.toString();
    //data = JSON.parse(data);
    console.log(data);
}

// update code called every frame
Manage.prototype.update = function(dt) {

};

// swap method called for script hot-reloading
// inherit your script state here
// Manage.prototype.swap = function(old) { };

// to learn more about script anatomy, please read:
// https://developer.playcanvas.com/en/user-manual/scripting/
Node-RED側のノードのトピックに入れた文字と、js側のトピックの文字は同一である必要がある。
チュートリアル5
初台ラボ・デジタルツイン・チュートリアル5 – スマートライト株式会社 (smartlight.co.jp)
~Node-REDでスポットライトの点灯消灯を制御する~
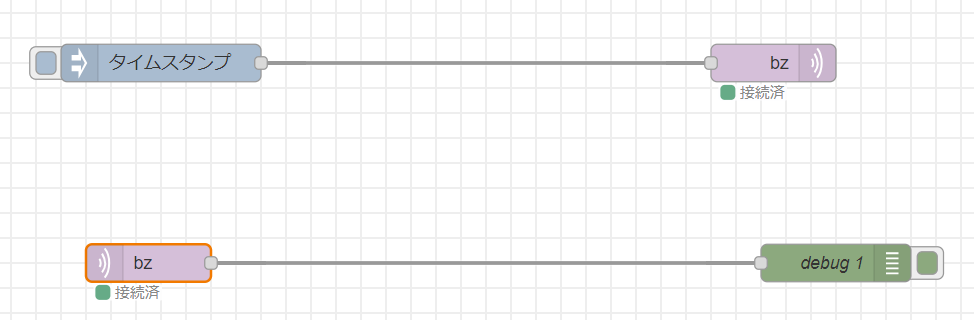
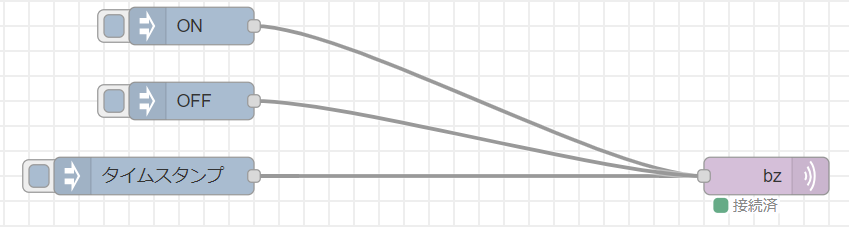
タイムスタンプは別になくてもよい
ON/OFFは文字列で設定。
manage.jsを書き換える。
var Manage = pc.createScript('manage');

// initialize code called once per entity
Manage.prototype.initialize = function() {
    let client = mqtt.connect('wss://public:public@public.cloud.shiftr.io:443');
    let topic = "bz";

    client.subscribe(topic);
    this.app.client = client;

    client.on("message", (topic, message) => this.control(message));
};

Manage.prototype.control = function(message){
    var app = this.app;

    this.spot = app.root.findByName("SpotLight");
    var data = message.toString();
    //data = JSON.parse(data);
    if (data == "ON"){
        this.spot.light.enabled = true;
    }
    if (data == "OFF"){
        this.spot.light.enabled = false;
    }
}

// update code called every frame
Manage.prototype.update = function(dt) {

};

// swap method called for script hot-reloading
// inherit your script state here
// Manage.prototype.swap = function(old) { };

// to learn more about script anatomy, please read:
// https://developer.playcanvas.com/en/user-manual/scripting/
チュートリアル6
初台ラボ・デジタルツイン・チュートリアル6 – スマートライト株式会社 (smartlight.co.jp)
~Node-REDで制御する灯体を増やす~
注意
SpotLightを増やしたがエディタ上で確認できない時、全く同じ場所にコピーされたので重なって一つに見えているだけ。それぞれの見分けがつくように場所を移動させよう。
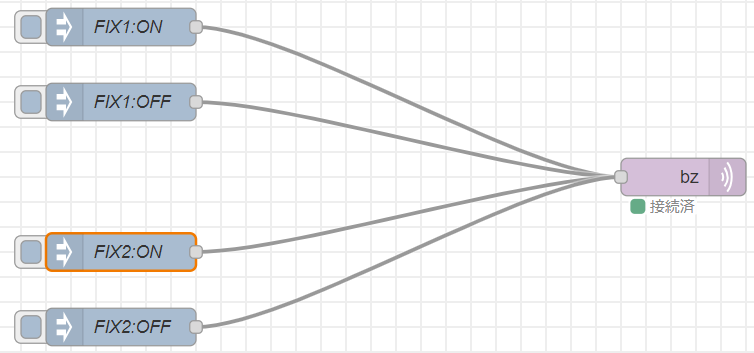

処理の区別のために名前も付けよう。
msgには複数の情報を送るためJSON形式で書く必要がある。
編集から下記のように中身を記述する。
{
    "fixture": "SpotLight1",
    "light": "ON"
}
manage.jsは以下のように修正。
var Manage = pc.createScript('manage');

// initialize code called once per entity
Manage.prototype.initialize = function() {
    let client = mqtt.connect('wss://public:public@public.cloud.shiftr.io:443');
    let topic = "bz";

    client.subscribe(topic);
    this.app.client = client;

    client.on("message", (topic, message) => this.control(message));
};

Manage.prototype.control = function(message){
    var app = this.app;

    var data = message.toString();
    data = JSON.parse(data);

    var fixture = data["fixture"];
    var lightStatus = data["light"];

    this.spot = app.root.findByName(fixture);

    if ( lightStatus === "ON"){
        this.spot.light.enabled = true;
    }
    if ( lightStatus === "OFF"){
        this.spot.light.enabled = false;
    }
}

// update code called every frame
Manage.prototype.update = function(dt) {

};

// swap method called for script hot-reloading
// inherit your script state here
// Manage.prototype.swap = function(old) { };

// to learn more about script anatomy, please read:
// https://developer.playcanvas.com/en/user-manual/scripting/
チュートリアル7
初台ラボ・デジタルツイン・チュートリアル7 – スマートライト株式会社 (smartlight.co.jp)
~PLAYCANVASのボタンからNode-REDにMQTT通信する~
button.jsを以下のように編集する。
var Button = pc.createScript('button');
//Button.attributes.add("message", {type:"string", default: "message"})

// initialize code called once per entity
Button.prototype.initialize = function() {
    this.entity.button.on("click",this.onPress, this);
};

// update code called every frame
Button.prototype.update = function(dt) {

};

Button.prototype.onPress = function(dt) {
    let client = this.app.client;

    let topic = "bz";
    let metric = `"ultra soul!"`;

    client.publish(topic, metric);
};
//Button.prototype.show = (message) => alert(message)

// swap method called for script hot-reloading
// inherit your script state here
// Button.prototype.swap = function(old) { };

// to learn more about script anatomy, please read:
// https://developer.playcanvas.com/en/user-manual/scripting/
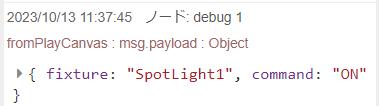
ノードがしっかり受け取れるように接続しておく。

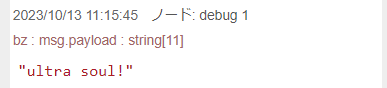
PLAYCANVASのボタンを押すとNode-REDにメッセージが送信された。
問題点

はじめ送信するmetricデータをこのように編集した。
するとメッセージはNode-REDに正しく送信されたものの意味の分からないエラーがPLAYCANAVS側から吐き出された。

調べていくとエラー文にある「u」が悪いというより送信している1文字目が悪さをしているようだった。
問題が起こっている場所は特定できたものの原因は不明であった。
対処方法として`(バッククォート)で囲むことでエラーが起こらずデータも正しく送信されるようになった。
チュートリアル8
初台ラボ・デジタルツイン・チュートリアル8 – スマートライト株式会社 (smartlight.co.jp)
~PLAYCANVAS側のステータスをNode-REDに送信~
button.jsのtopicと文言が一致していればノードのトピックを書き換える必要はない。
button.jsを書き換える。
var Button = pc.createScript('button');

Button.attributes.add("fixture", {type: "string"});
Button.attributes.add("command", {type: "string"});

// initialize code called once per entity
Button.prototype.initialize = function() {
    this.entity.button.on("click",this.onPress, this);
};

// update code called every frame
Button.prototype.update = function(dt) {

};

Button.prototype.onPress = function(dt) {
    var fixture = this.fixture;
    var command = this.command;

    let client = this.app.client;

    let topic = "fromPlayCanvas";
    let metric = `{"fixture":"` + fixture + `", "command":"` + command + `"}`;

    client.publish(topic, metric);
};
//Button.prototype.show = (message) => alert(message)

// swap method called for script hot-reloading
// inherit your script state here
// Button.prototype.swap = function(old) { };

// to learn more about script anatomy, please read:
// https://developer.playcanvas.com/en/user-manual/scripting/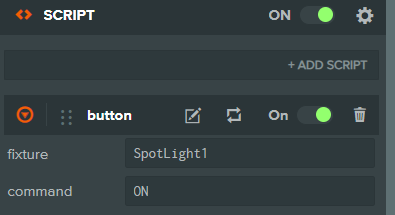
←ここのfixtureとcommandに書かれている内容が送られる。
注意点
送信する内容を決定しているlet metricについて今回は”(ダブルクォーテーション)と`(バッククォート)を使い分けている。'(シングルクォーテーション)は使っていない。バッククォートの代わりにシングルクォーテーションでも動作することが確認できたため、好みで変更して問題ない。
相違点
チュートリアルとの違いはNode-REDにJSONの変換を行うノードを追加しなくてもしっかりとJSON形式になっていたという点。
チュートリアル9
初台ラボ・デジタルツイン・チュートリアル9 – スマートライト株式会社 (smartlight.co.jp)
~ボタンを増やして送る信号を変える~
ボタンを増やして名前を変える。位置も変えることで二つのボタンを押せるようになる。
PLAYCANVAS
PLAY:https://playcanv.as/p/LKgPMk6u/
FORK:https://playcanvas.com/project/1149680/overview/digital-twin